QR Table Stands for Restaurants and Cafes
Planning table stands comes down to four decisions: what each stand links to, how big the code must be for the distance people scan from, how many to print, and where they go. This guide works through all four for one example café with 12 tables and a bar, using the numbers the free tool produces.
A printed QR card wrinkles, curls and soaks up spills. A 3D-printed stand is rigid, wipes clean and stays put, so the code looks the same in the evening as it did in the morning. The catch is that a printed stand can never be edited: whatever link and size you choose are fixed in plastic. That is why it pays to plan before you print the first one.
Everything below is a worked example, not a report of tests. The café, its web address (cafe.example) and its tables are made up. The sizes and dimensions are calculated from the same rules the tool uses to build the 3D model, so you can reproduce each one yourself.
The example: a café with 12 tables and a bar
Our café wants three kinds of stand. Every table gets one that opens the ordering page already set to that table. The bar gets a menu stand. The till gets a review stand. Here is the plan we will size and count in the rest of the guide.
| Stand | Where | Link (example) | Relief text |
|---|---|---|---|
| Table stand ×12 | Center of each table | https://cafe.example/order?table=7 (one per table, 1 to 12) | Table 7 |
| Bar menu stand ×1 | Bar counter, guests on stools | https://cafe.example/menu | Menu |
| Review stand ×1 | Beside the card reader | The review link Google gives you | Review us |
Wifi is a separate job and is not in this plan: the tool has a Wifi mode and a wall plaque format for it, covered in QR keychains and wall plaques.
The relief text (up to 24 characters) is raised letters on the front of the stand, below the code. On the table stands it does a practical job: because each link is unique, the number on the stand tells staff which one belongs where.
Step 1: Write each link so the code stays small
The number of modules (the little squares of a QR code) grows with the length of the text. More modules means a physically bigger stand at the same module size, so a short link is a smaller, cheaper stand. Using the standard QR capacity table at error correction level M, which is what the tool uses when there is no logo:
| Example link | Characters | Modules per side | QR width at Medium (2.3 mm) |
|---|---|---|---|
https://cafe.example/menu | 25 | 25 | 57.5 mm |
https://cafe.example/order?table=7 | 34 | 29 | 66.7 mm |
https://cafe.example/order?table=7&src=qr | 41 | 29 | 66.7 mm |
The tool shows the module count for whatever you paste, so treat this table as a way to see the pattern, not as a replacement for checking. The practical lesson: every extra parameter you add is a decision to keep the stand the same size or not. The jump from 25 to 29 modules adds 9.2 mm to the code at Medium.
Menu link
Link to a page that loads quickly on a phone connection, not to a large file guests have to pinch and zoom. A simple web page with editable text is easier to keep current than a PDF. Because the printed code can never change, put the menu on an address you control and keep that address alive. Before you print, open the link on your phone using mobile data instead of the café wifi, since that is what many guests will do.
Google review link
Google Business Profile has an option to copy a link that opens your review form directly. The wording of that option changes from time to time, so look inside your profile for something like share your profile or ask for reviews, and paste whatever link it gives you into the tool. Do not rewrite it yourself, and be cautious about running it through a free link shortener, because a shortener account you stop paying attention to is one more thing that can stop working under a printed stand. Keep to Google's rules: no rewards in exchange for reviews, and no steering only happy customers toward the form.
Ordering with the table number: ?table=7
If your ordering or payment page is your own (or your provider lets you set it up), a stand can open it already knowing the table. The common way is a query parameter: the address, then a question mark, then a name and a value.
https://cafe.example/order?table=7
https://cafe.example/orderis your ordering page.?starts the parameters.table=7is a name and a value. The nametableis only an example: use whatever your ordering page expects.
3D QR Generator only encodes the text you give it. It does not know about tables, orders or any ordering service, so the page at the other end has to read the parameter itself. If you are unsure, ask whoever built or hosts your ordering page whether it can read a table number from the address. If it cannot, link to the plain page and have guests enter their table.
Two habits prevent most mistakes. First, make one stand per table, put the number in the relief text, and scan each stand after you place it to confirm the page shows the right table. Second, keep links in a set the same length where you can. With the 34-character link above, tables 1 to 9 and tables 10 to 12 (35 characters) both need 29 modules at level M, so the stands match. Add a logo and that stops being true (see the FAQ), so check the module count for the longest link before you decide on a size.
Step 2: Size each stand by scanning distance
The tool's size calculator uses one rule of thumb: the QR width in millimeters should be at least the scanning distance in centimeters (a phone reads a code from about ten times its width), and never less than the module count times 1.5 mm. It proposes the smallest preset that meets that and suggests a relief height: up to 100 cm, 1.2 mm; up to 300 cm, 1.6 mm; farther, 2.0 mm.
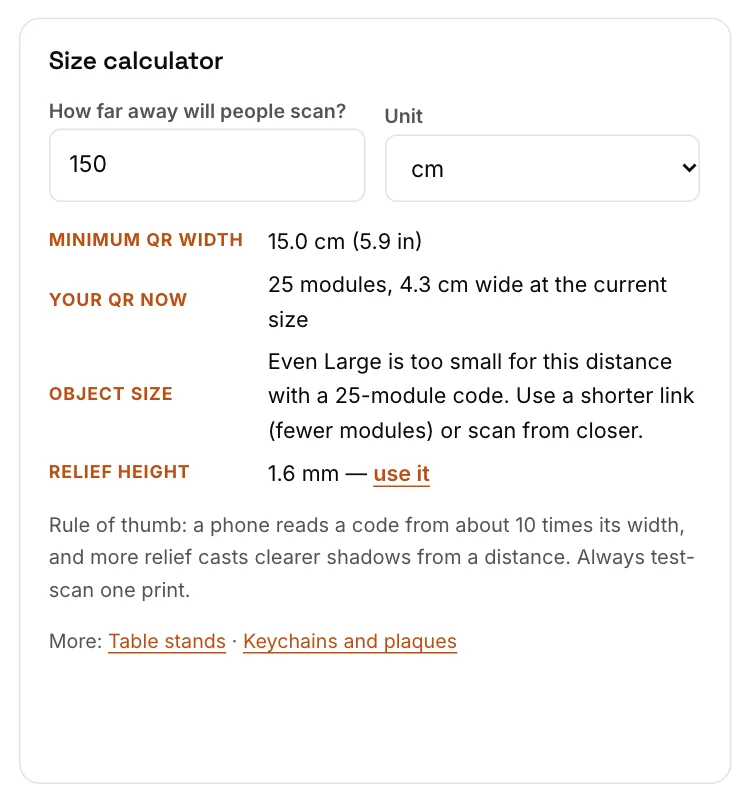
- Minimum QR width: 15.0 cm. 150 cm ÷ 10. This is the width the rule asks for.
- Your QR now: 25 modules, 4.3 cm wide. What you have selected right now (25 modules at Small, 42.5 mm). Compare it with the line above.
- Object size. Names the smallest preset that meets the minimum. Here it says even Large is too small, because the largest 25-module code is 75 mm. The tool suggests a shorter link or scanning from closer.
- Relief height: 1.6 mm. The suggestion for distances over 100 cm. The "use it" link applies it.
Now apply it to the café at three real distances. These are the three questions to ask for any room: how far is the guest's phone from the code?
| Scanning distance | Minimum width | 25 modules (/menu) | 29 modules (/order?table=7) | Relief |
|---|---|---|---|---|
| 40 cm: seated guest lifting a phone over the stand | 40 mm (43.5 mm with 29 modules) | Small, 42.5 mm | Small, 49.3 mm | 1.2 mm |
| 60 cm: stand in the middle of a four-top, across the table | 60 mm | Large, 75 mm (Medium is 57.5 mm, just short) | Medium, 66.7 mm | 1.2 mm |
| 150 cm: someone waiting a step back from the bar | 150 mm | None: even Large is 75 mm | None: even Large is 87 mm | 1.6 mm |
What we would pick. For the tables, Medium on 29 modules. The rule is satisfied at 40 cm by Small, but Small modules are 1.7 mm, and the tool's scan check adds a note below 1.9 mm (use a 0.4 mm nozzle or smaller and layers of 0.2 mm or finer). Medium's 2.3 mm modules avoid that note and give extra margin at 60 cm. That is our judgment, not a measurement, so test-scan one. For the bar menu, 25 modules at Large, since guests on stools are closer to 60 cm.
What to do about 150 cm. The calculator is telling you that a tabletop stand is the wrong object for that distance. Putting the code where guests are already close (on the counter at the order point) solves it for free. The only other routes are a shorter link (21 modules at Large is only 63 mm, still short of 150 mm) or a much larger printed sign. The rule of thumb is not a guarantee in either direction, so test-scan from the real spot before you decide.
Always measure the real distance from the guest's hands to the code at the farthest seat, not the width of the table. Colors matter as much as size: use a light base and a dark code and keep the contrast check green (see will your 3D-printed QR code scan).
Step 3: What the stand looks like and how big it really is
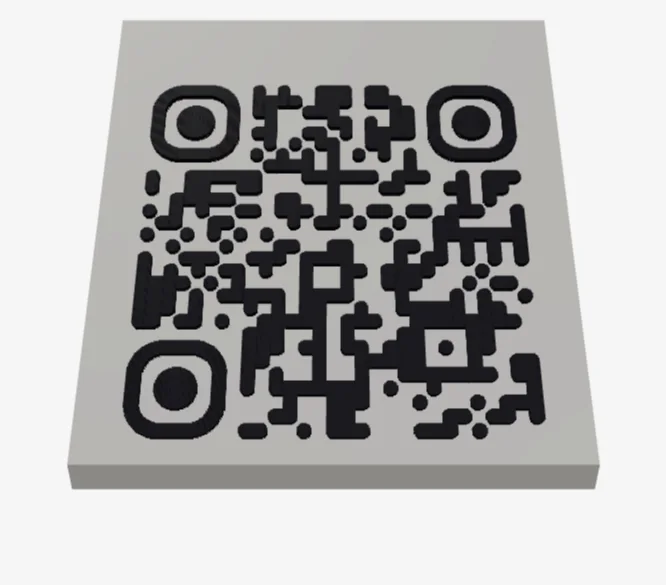
How to read it: the light slab is the base and the black modules are the raised code, which is a separate object in the two-color 3MF. The slab tilts back at 38 degrees with a 5 mm lip at the front, so the face leans back toward a seated guest. There is a 4 mm blank border around the code, and the base has 6 mm of extra depth behind the code area. Relief text, if you add it, goes on the slope below the code.
The dimensions come from four settings: margin 4 mm, front lip 5 mm, back extra 6 mm and slope 38 degrees. Using QR for the code width:
- Width = QR + 2 × 4 (margin) + 2 × 4 (margin of the ramp) = QR + 16.
- Flat footprint depth D = QR + 8, plus 8 if there is relief text.
- Slope length = D + 1.2 × 4 = D + 4.8.
- Depth on the bed = slope length × cos 38° + 6.
- Height at the back = 5 + depth × tan 38°.
Check with Medium, 25 modules, no text: QR 57.5, so width 73.5. D = 65.5, slope length 70.3, depth 70.3 × 0.788 + 6 = 61.4, height 5 + 61.4 × 0.781 = 53.0. Here are all six common settings:
| Setting | Modules | QR width | Stand width | Depth × height, no text | Depth × height, with text |
|---|---|---|---|---|---|
| Small (1.7 mm) | 25 | 42.5 | 58.5 | 49.6 × 43.7 | 55.9 × 48.7 |
| Medium (2.3 mm) | 25 | 57.5 | 73.5 | 61.4 × 53.0 | 67.7 × 57.9 |
| Large (3.0 mm) | 25 | 75.0 | 91.0 | 75.2 × 63.7 | 81.5 × 68.7 |
| Small (1.7 mm) | 29 | 49.3 | 65.3 | 54.9 × 47.9 | 61.2 × 52.8 |
| Medium (2.3 mm) | 29 | 66.7 | 82.7 | 68.6 × 58.6 | 75.0 × 63.6 |
| Large (3.0 mm) | 29 | 87.0 | 103.0 | 84.6 × 71.1 | 90.9 × 76.1 |
The raised code adds 0.8, 1.2, 1.6 or 2.0 mm on top of the slope, depending on the relief you pick (1.2 mm by default). Every setting above stays well under the tool's 180 mm warning for beds, with the biggest side at 103 mm. Raised text is limited to 24 characters, and letters are 6 mm tall on a stand. The tool shrinks them if the line would be wider than the stand minus 6 mm, and the scan check flags text it had to shrink or that falls below 3 mm.
Step 4: How many to print, and roughly how long
The formula is stands in service, plus about 10 to 20 percent spares, plus test prints. For the example:
| Item | Quantity | Setting | Size with text (W × D × H, mm) |
|---|---|---|---|
| Table stands | 12 | Medium, 29 modules | 82.7 × 75.0 × 63.6 |
| Bar menu stand | 1 | Large, 25 modules | 91.0 × 81.5 × 68.7 |
| Review stand | 1 | Medium (assuming 29 modules) | 82.7 × 75.0 × 63.6 |
| Spares | 2 | 10 to 20 percent of 14 is 1.4 to 2.8 | As the stand they replace |
| Test prints | 0 to 2 | One per design, made with the real link | As above |
That is 16 stands, plus up to two more if you test with throwaway links. A test made with the real link for table 1 is not wasted: once it scans, it becomes stand 1. Numbered stands complicate spares. A generic spare is useless, so either print the two spares as the tables most likely to lose a stand (for example a window table), or keep the 12 saved settings and reprint only the one that breaks.
Time and filament (estimates only). The tool's FAQ puts a typical table stand at 30 to 90 minutes, depending on size, printer and settings. For 16 stands that works out to roughly 8 to 24 hours of printing in total. Treat that as a planning range, not a promise: your printer, nozzle, layer height and the number of color changes decide the real figure. On a wedge, the two colors alternate through many layers (the code is tilted), so a multi-color printer purges more and takes longer than for a flat plaque. Your slicer will show its own estimate once the file is loaded.
For filament, we can give a calculated ceiling. A medium table stand with text (29 modules) has a solid base of about 212 cm³, which would be at most about 263 g of PLA if printed completely solid (PLA at roughly 1.24 g/cm³; brands vary). Stands are normally printed with sparse infill, so the real number is a fraction of that. Use the slicer's estimate instead; the ceiling is useful only to see that these are chunky objects, and that cutting the code size is the biggest filament saver.
Placement that works in a real room
- Put the stand where eyes already go. The middle of the table, beside the condiments, beats a corner. Then check the distance from the farthest seat against the number you used in the calculator.
- Watch for glare. A window or a spotlight directly behind the guest can bounce off the surface. Move the stand a hand's width or turn it slightly. Matte filaments usually reflect less than glossy ones.
- Keep the border around the code clear. The blank margin should stay blank. A menu card leaning on the stand covers part of the code and breaks the scan.
- Add grip. Thin rubber feet or a non-slip pad stop it sliding on polished tables. The flat underside makes this easy.
- Be consistent. If every stand sits in the same spot, staff can point at it without looking.
Dim rooms are a special case. Candlelight is flattering but gives phones very little to work with. A strong contrast between base and code helps, and guests can always use their phone's light. Not everyone will want to use a phone at the table, so keep paper menus available, make sure the page reads well at large text sizes, and tell staff where the stands are so they can help.
Keeping the stands clean
Wipe stands with a damp cloth and a little mild soap, then dry them. PLA, the most common filament, can soften at roughly 55 to 60 degrees Celsius, so keep it out of dishwashers, hot water and direct afternoon sun on a window ledge. PETG tolerates more heat, and ASA is a common choice for stands on an outdoor patio. The ridges between layers hold grime, so wipe along the code rather than across it, and replace a stand whose modules are scratched or stained. These stands sit on tables but should not touch plates or food, because ordinary printed plastic is not rated as food-safe. Check your local health rules for how often surfaces must be cleaned.
Checklist: day one, every day, every month
- Before printing: open every link on a phone on mobile data, and confirm the table number links go to the right page.
- Before placing: scan each stand from the farthest seat. Fix glare by moving the stand, not the lights.
- Every closing: wipe, dry and look at the code. Remove any stand with a scratched or stained code.
- Weekly: scan a few stands and confirm the page still shows the current menu and prices.
- Monthly: scan every stand, and note which table number sits on which table.
- After any change to the website: re-test the three links, since the printed code cannot be updated.
- Always: keep a few printed menus for guests who prefer paper.
If a stand stops scanning, use the QR code not scanning checklist to find out why.
Frequently asked questions
Which size suits a small cafe table?
Run the size calculator with the real distance from the farthest seat to the stand. With a short link of 25 modules, the tool's rule of thumb (QR width in millimeters at least the scan distance in centimeters) is met by Small up to about 42 cm, Medium up to about 57 cm and Large up to 75 cm. Medium is a sensible default because its 2.3 mm modules print without the tool's small-module note.
Can one stand serve both the menu and reviews?
It is better to make two stands, or to link to a page with both options clearly labeled. One code with one purpose is easiest for guests.
Will a stand survive spills?
Yes. Water and mild soap will not harm printed plastic, so wipe it with a damp cloth and dry it. Avoid hot water, dishwashers and strong solvents, because PLA can soften at around 55 to 60 degrees Celsius. Wipe along the code rather than across the layer ridges.
Can I add my logo?
Yes, but it costs modules. With a logo in the center the tool uses a higher error correction level, so the same link needs a bigger code: by the standard QR capacity table, a 34-character link goes from 29 to 33 modules, which is 66.7 mm versus 75.9 mm wide at Medium. Scan a test print before making a batch.
How do I put the table number in the link?
Add a parameter to your own ordering address, for example https://cafe.example/order?table=7, and make one stand per table. The page has to be set up to read the parameter, because the tool only encodes the text you give it. Scan every stand after placing it and confirm the page shows the right table.
Why does the calculator say Large is too small at 150 cm?
The rule of thumb asks for a code at least 150 mm wide to scan from 150 cm, and the largest preset with 25 modules is 75 mm wide. Move the code closer to where guests stand, shorten the link, or use a larger printed sign for far-away scanning, then test-scan from the real spot.
Try it in the tool
Put this guide into practice with these free tools:
Make your own 3D QR code
Choose the table stand format in the tool, set the size, and download a file for your first test stand.
Open the free tool